How to Prepare Your Garden for Spring
To prepare your garden for spring, start by checking for winter damage, cleaning up gently, and making sure the soil is ready to work. Then refresh your garden beds, prune the right plants, check your containers, and plan planting around local frost dates. You do not need to do everything in one weekend. This step-by-step guide and spring garden checklist will help you decide what needs attention now and what can wait.
In This Guide
Why Spring Garden Preparation Matters
Spring preparation is not just about making your garden look tidy after winter. It is about creating the right conditions for new growth before the growing season gets busy.
Checking the soil, clearing damaged material, and choosing the right planting time can make a noticeable difference to how easily your garden develops.
Healthier Soil
Gentle preparation and finished compost can improve the growing environment without unnecessary digging or compaction.
Easier Summer Care
Checking drainage, mulch, water access, and equipment now helps make later maintenance more manageable.
Better Planting Times
Starting cool-season crops first and waiting for suitable conditions for tender plants reduces avoidable setbacks.
If you are planning a new bed or reorganizing your yard, our Garden & Outdoor guide explains how to work with sunlight, drainage, growing space, and seasonal care.
Step 1: Walk Through Your Garden Before You Start
Choose a reasonably dry day and look around before reaching for your tools. Some plants may already be growing, while others are still dormant.
A perennial that looks lifeless in early spring may simply need more time. Likewise, a garden bed that looks untidy may still provide shelter for beneficial insects.
What should you check first?
- Look for broken branches and obvious winter damage.
- Check which plants have started growing and which remain dormant.
- Notice areas with muddy, compacted, or waterlogged soil.
- Check whether winter weather displaced mulch or damaged plant supports.
- Inspect containers for cracks, blocked drainage, and unstable placement.
- Look for emerging weeds and signs of disease or pest activity.
- Observe where the garden receives direct sunlight during the day.
How can you tell whether a woody plant is still alive?
On a woody stem, gently scratching a small section of bark may reveal green tissue underneath. Check more than one section before deciding what to remove.
This method does not work for every type of plant. For uncertain herbaceous perennials, it is usually better to wait and watch for new shoots.
Step 2: Clean Up Without Stripping the Garden Bare
Spring cleanup creates room for new growth, but it does not need to be aggressive. Dry stems, leaves, and other garden material can shelter overwintering insects.
Start with obvious problems rather than clearing every bed at once.
Remove these items first
- Broken branches that could cause injury or damage.
- Clearly diseased plant material.
- Wet, rotting leaves packed around vulnerable plant crowns.
- Damaged supports, broken ties, and discarded plastic labels.
- Young weeds growing in beds you intend to prepare.
- Spent annual plants that will not return.
What can stay a little longer?
Consider leaving some dry stems, leaf litter, and undisturbed corners while temperatures remain cold.
Clear around emerging plants where necessary, but avoid removing every natural shelter at the same time.
Step 3: Check Whether Your Soil Is Ready to Work
Working saturated soil can damage its structure and create compaction. That makes it harder for roots, water, and air to move through the growing area.
Before digging or planting, take a small handful of soil from the bed you want to prepare.
Try the simple soil squeeze test
Squeeze the soil gently, open your hand, and press the soil with a finger.
| Soil condition | What it means | What to do |
|---|---|---|
| Sticky or muddy | The soil is still too wet. | Wait for better drainage before working it. |
| Forms a ball but crumbles when pressed | It may be ready for gentle preparation. | Prepare the intended planting area. |
| Very dry and loose | The root zone may need moisture. | Check moisture deeper in the bed. |
| Water collects after rain | Drainage or compaction may be a problem. | Investigate before adding sensitive plants. |
Soil moisture and soil temperature are different. Even if a bed is workable, it may still be too cold for warm-season seeds and transplants.
Step 4: Prepare Garden Beds for the New Season
Once the soil is ready, focus on the beds you intend to plant first. You do not need to disturb the entire garden.
Remove young weeds
Pull emerging weeds before they become established. Try to remove as much of the root system as practical, especially with persistent perennial weeds.
Loosen compacted areas gently
If the upper soil layer is compacted, use a garden fork or hand cultivator where needed. Established beds with good structure may require little or no digging.
Add finished compost
Well-finished compost can improve soil structure and contribute nutrients. A modest surface layer is often useful for an established bed.
Adjust the amount to your soil and the plants you intend to grow. If you are unsure about nutrient levels or pH, consider a soil test before adding lime or large amounts of fertilizer.
Protect the soil surface
Apply suitable mulch where needed, keeping it away from stems and plant crowns. For beds intended for direct sowing, leave the seed rows accessible until seedlings establish.
Step 5: Prune Carefully and Divide Perennials
Pruning is one spring task where timing matters. Some plants benefit from early pruning, while others are better left until after they bloom.
Start with damaged growth
Identify dead, broken, and diseased growth before making larger cuts. Use clean, sharp tools and follow the pruning requirements of the plant.
- Remove clearly dead or broken growth where appropriate.
- Wait for new shoots before cutting uncertain stems.
- Avoid heavy shaping unless you know the species.
- Prune many spring-flowering shrubs after they bloom.
- Clean tools when moving between diseased plants.
Many spring-blooming shrubs form their flower buds the previous year. Cutting them back too early may remove this season's flowers.
Divide crowded perennials when appropriate
Spring is a suitable time to divide many perennials, especially those that flower later in the growing season.
Look for crowded clumps, declining growth in the center, or plants that have spread beyond their intended space.
Choose a mild day, water beforehand if the soil is dry, and lift the clump carefully. Divide it into pieces with healthy roots and shoots, replant promptly, and water thoroughly.
Step 6: Plan Spring Planting Around Frost and Soil Conditions
One warm afternoon does not mean frost danger has passed. Soil temperatures, nighttime lows, and local weather patterns are important when planning new planting.
Check your local average last frost date as a planning reference, then watch the actual forecast and follow each plant's growing requirements.
Choose the right plants for early spring
| Plant group | Examples | Spring approach |
|---|---|---|
| Cool-season vegetables | Peas, spinach, radishes, kale, lettuce | Plant when local soil and weather conditions suit the crop. |
| Cool-season herbs | Parsley and cilantro | Start earlier where growing conditions permit. |
| Hardy flowers | Pansies, violas, suitable perennials | Match planting to each species' cold tolerance. |
| Warm-season vegetables | Tomatoes, cucumbers, zucchini, peppers | Wait for suitable soil and nighttime temperatures. |
| Tender herbs and annuals | Basil and tender summer flowers | Protect from frost and harden off before transplanting. |
Harden off indoor-grown seedlings
Seedlings started indoors need time to adjust to sunlight, wind, and changing outdoor temperatures.
Start with short periods outside in a sheltered position. Gradually increase exposure over roughly one to two weeks, depending on the weather and crop.
Bring tender seedlings indoors during unsafe cold, strong wind, or other damaging conditions.
Match plants to the sunlight in your garden
Before choosing new plants, consider how much direct sun the intended planting area receives.
Our Plant Light Needs Explained guide helps you understand full sun, partial shade, and other common light requirements.
Planning a small kitchen herb garden?
Parsley, chives, mint, rosemary, thyme, and basil can be useful additions, provided their individual light, moisture, and temperature needs are respected.
The Herbs & Natural Living guide offers more help with choosing, growing, and caring for familiar kitchen herbs.
Step 7: Refresh Raised Beds, Pots, and Balcony Planters
Containers and raised beds can behave differently from in-ground beds. They may warm up faster, dry sooner, or experience greater temperature fluctuations.
Check containers after winter
- Inspect pots for cracks and instability.
- Clear blocked drainage holes.
- Remove dead annuals and obvious root debris.
- Refresh unsuitable or deteriorated potting mix.
- Check railing planters and fasteners for safety.
Ordinary yard soil can become too dense inside a container. A suitable container potting mix usually provides a better balance of moisture retention, drainage, and air around the roots.
Top up raised beds thoughtfully
Raised-bed soil may settle over winter. Check the level and condition before adding more material.
Use an appropriate growing mix and finished compost as needed. Avoid filling the entire bed with compost alone.
For more detailed advice on pot size, drainage, sunlight, and safe planter placement, see our Balcony & Container Gardening guide.
Step 8: Check Tools, Watering, Fertilizer, and Plant Health
Once the main beds are ready, take a little time to check the equipment and routines that support your garden throughout the season.
Get your gardening tools ready
Clean and sharpen pruners, wash pots and seed trays, inspect gloves, and check the condition of stakes, trellises, and plant supports.
Test hoses, watering cans, and drip irrigation before plants depend on them. Look for leaks, blocked emitters, and damaged connections.
Water according to actual conditions
Spring weather may be rainy, but containers and raised beds can still dry quickly in sun or wind.
Check the soil before watering. Consider recent rain, plant size, root depth, temperature, and the type of growing medium.
If you are unsure how to adjust your routine, read How Often Should You Water Plants? for practical advice on outdoor pots, garden beds, and changing weather conditions.
Feed the garden thoughtfully
Do not fertilize automatically simply because spring has arrived. Finished compost may be a useful starting point, but nutrient requirements differ by soil and plant type.
Excess fertilizer can cause nutrient imbalances or encourage unwanted growth. Use soil-test results where available and follow plant-specific feeding guidance.
Watch for pests and plant stress
Check leaf undersides, new shoots, and tender stems regularly. Pay attention to changes rather than assuming every mark is a serious problem.
- Curled or distorted new growth.
- Sticky leaves or clusters of tiny insects.
- Fine webbing or unusual spots.
- Chewed leaf edges.
- Yellowing or wilting despite moist soil.
- Weak or stretched seedlings.
Identify the problem before choosing a treatment. Not every insect is harmful, and a few damaged leaves do not automatically mean the plant needs pesticide.
If symptoms are spreading, the Plant Problems guide can help you check moisture, light, visible damage, and possible pests before taking the next step.
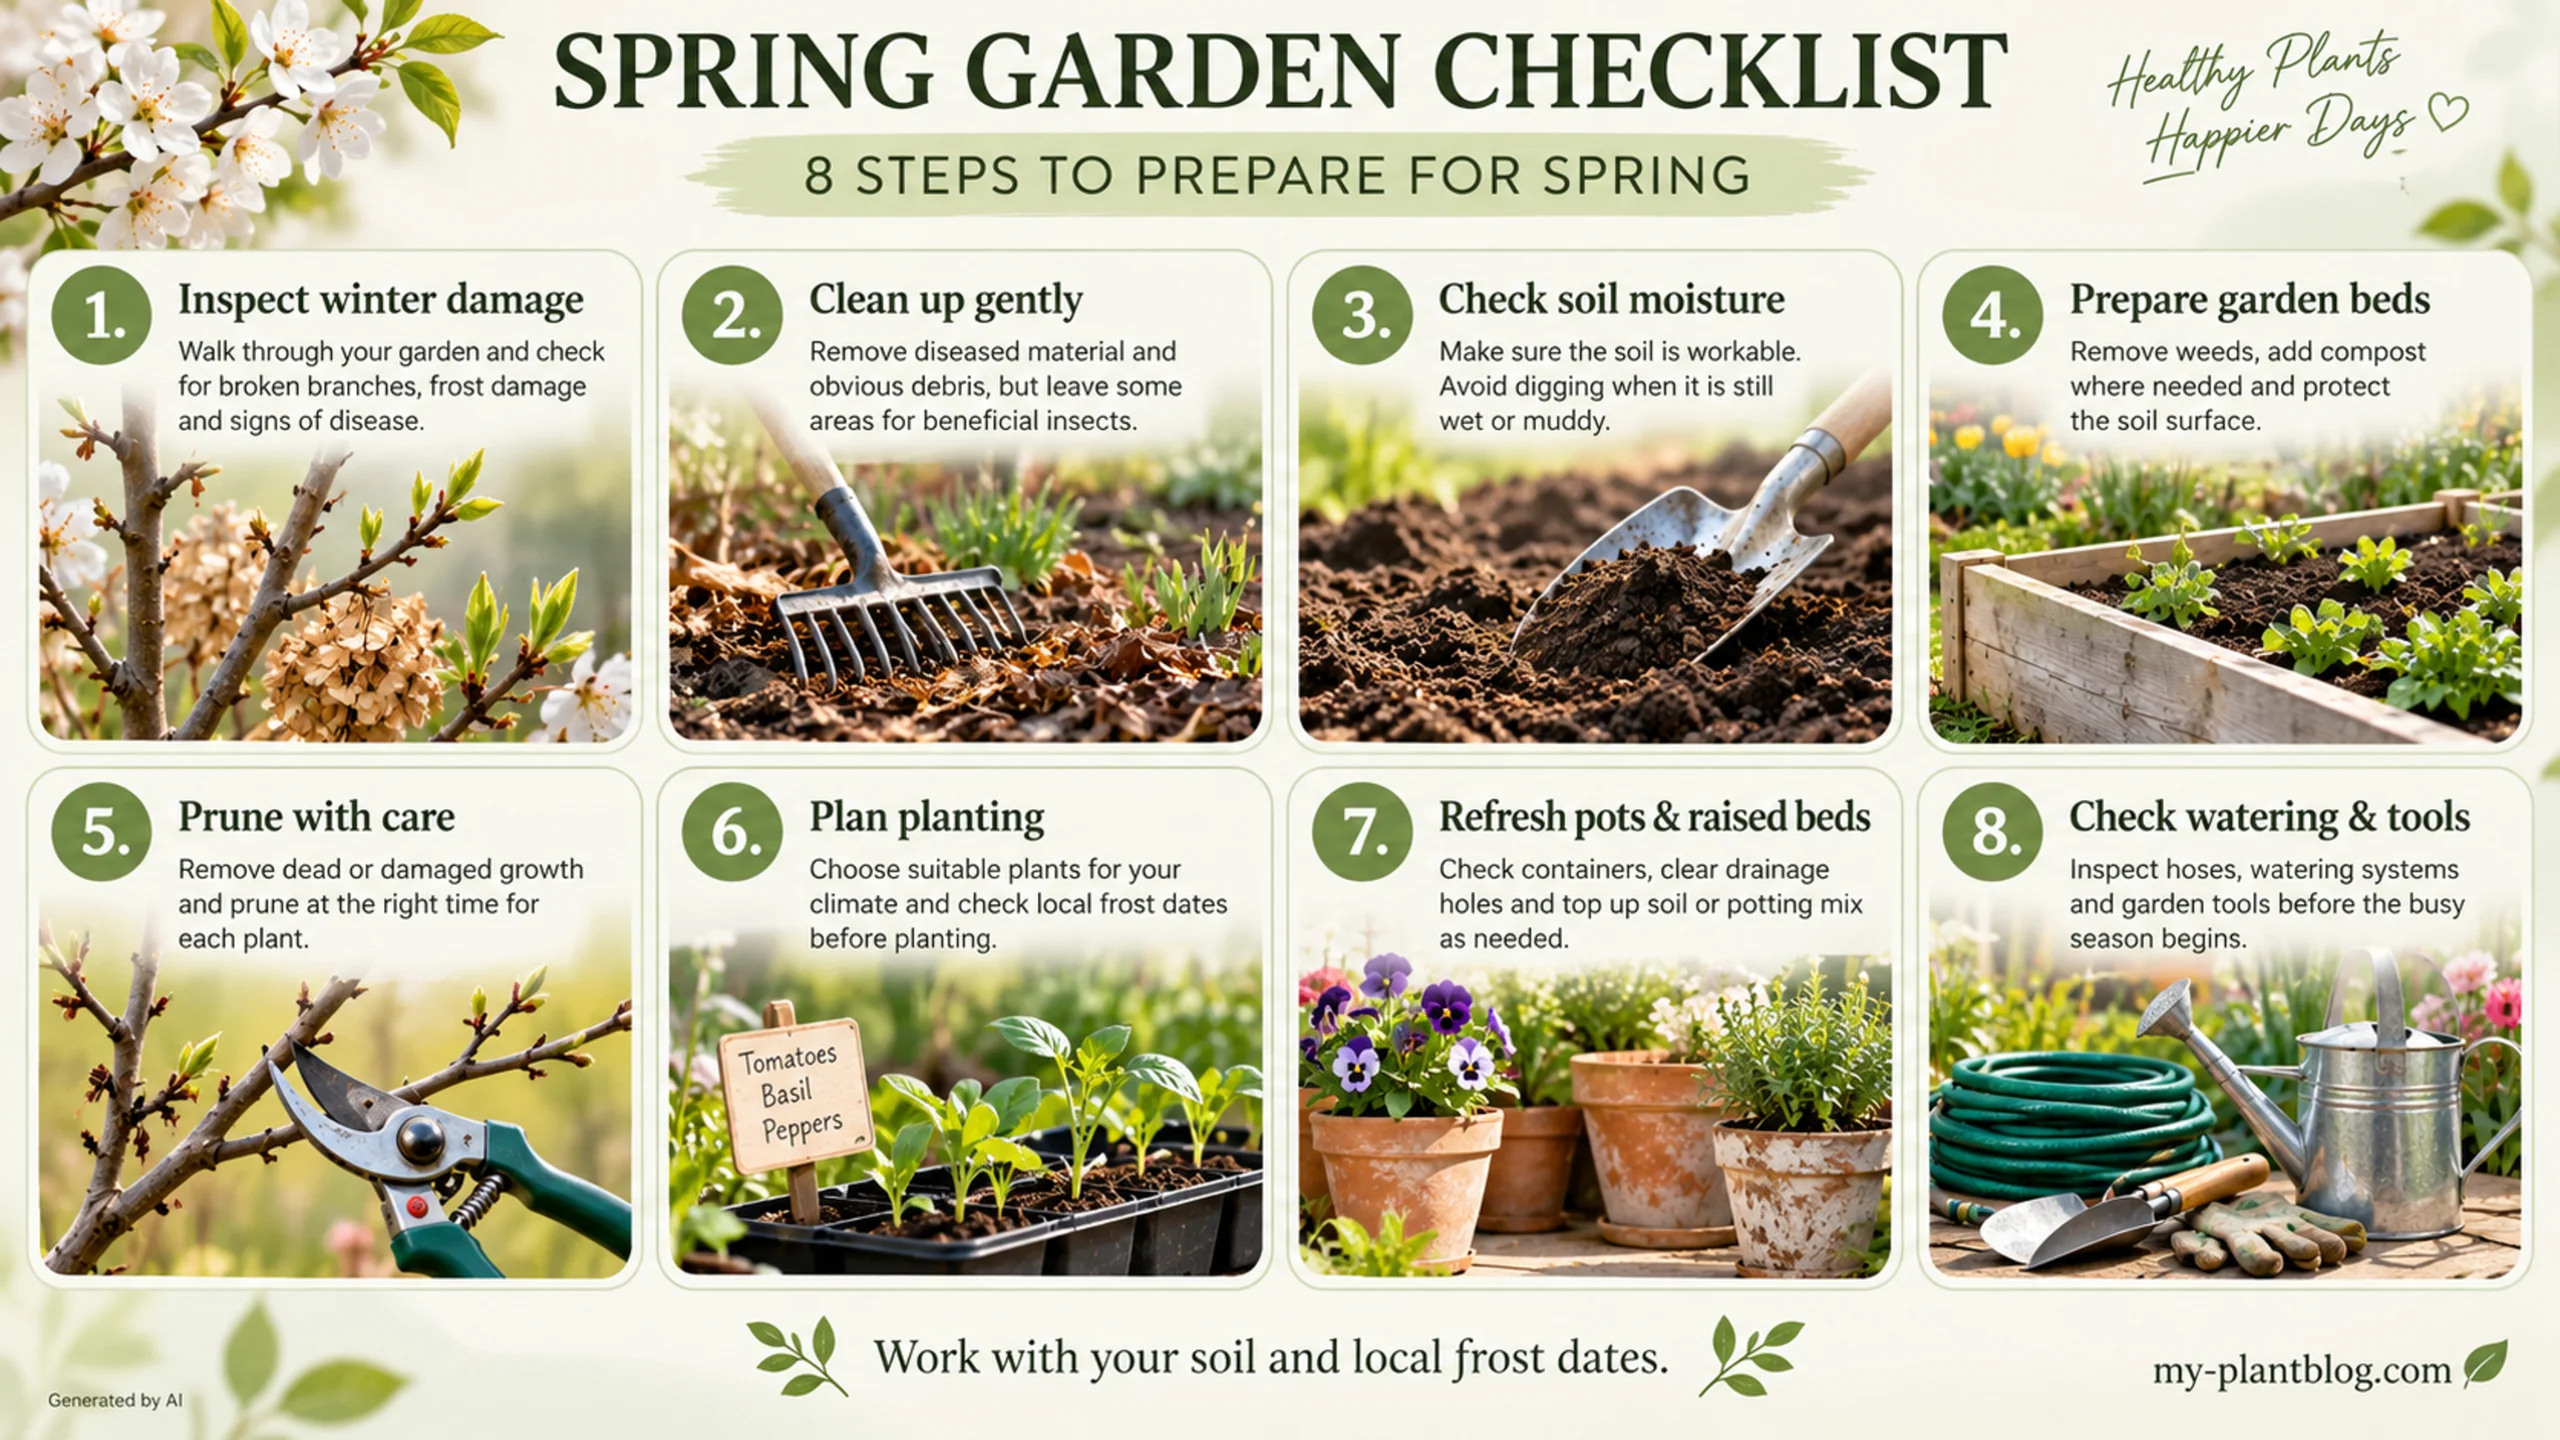
Your Practical Spring Garden Checklist
Use this checklist over several days or weekends. Start with what your garden needs now, then complete the remaining tasks when conditions are right.
- Walk through the garden and note winter damage.
- Identify emerging growth and dormant plants.
- Remove unsafe branches and diseased material.
- Leave some insect-friendly areas undisturbed.
- Wait until soil is workable before digging.
- Pull young weeds from the beds you plan to use.
- Add finished compost where needed.
- Protect prepared soil with suitable mulch.
- Prune according to plant type and bloom time.
- Divide suitable overcrowded perennials.
- Check local frost and soil conditions before planting.
- Start appropriate cool-season crops first.
- Harden off indoor-grown seedlings gradually.
- Check containers and clear drainage holes.
- Top up settled raised beds where needed.
- Clean tools and test hoses and irrigation.
- Check soil moisture before watering.
- Feed plants only where additional nutrients are needed.
- Inspect new growth for pests and stress.
- Make notes about what worked for next spring.
Common Mistakes When Preparing Your Garden for Spring
Many spring gardening problems come from doing the right task at the wrong time. These are some of the most useful mistakes to avoid.
Warm air does not mean the soil is ready. Wait for workable ground and suitable conditions for each plant.
Some winter stems and leaves provide shelter for beneficial insects. Clean gradually rather than removing everything at once.
Bloom time and growth habit determine suitable pruning periods. Check the species before making major cuts.
Tomatoes, basil, peppers, and many summer flowers need warmer conditions than hardy spring plants.
Nutrient requirements differ. Start with the soil and add fertilizer only where appropriate.
Rain does not guarantee that every raised bed or container has enough moisture. Check the root zone directly.
Spring Garden Preparation FAQ
When should I start preparing my garden for spring?
Start with inspection and simple repairs when weather allows. Wait to work garden soil until it has thawed, drained, and become workable. Planting times depend on your climate and the crops you grow.
How do I know if my soil is ready to work?
Squeeze a small handful of soil. If it is sticky and muddy, wait. If it crumbles when pressed, it may be ready for gentle preparation.
Should I remove all leaves from my garden beds?
No. Clear diseased or rotting material where necessary, especially around vulnerable plant crowns. Consider leaving some undisturbed areas for overwintering insects.
What should I prune first in spring?
Begin by identifying dead, damaged, and diseased growth. Check individual pruning requirements before major cuts. Many spring-flowering shrubs are best pruned after bloom.
Can I plant flowers as soon as garden centers sell them?
Not necessarily. Hardy flowers may tolerate cooler conditions, but tender annuals need protection from frost. Check each plant's temperature requirements and your local forecast.
Is compost enough for spring garden preparation?
Compost is a useful soil amendment, but it does not supply every nutrient in the same amount. Some crops may need additional feeding based on soil conditions and their nutrient requirements.
How should I prepare containers for spring?
Check for cracks, remove old debris, confirm drainage, and refresh unsuitable potting mix. Choose plants that match the container size and available light.
Give Your Garden a Good Start, One Step at a Time
Preparing your garden for spring does not have to feel like a race. Start with what you can observe, work the soil when it is ready, and let the weather guide your planting schedule.
A garden that develops gradually is easier to understand and manage. Keep checking the soil, watch new growth, and adjust your routine as the season changes.
For more help with light, watering, potting mix, and everyday plant care, explore our beginner-friendly Grow Guides.